Avoid This HTTPS Mistake When Setting Up a Custom Domain for Github Pages Website

Intro
Apparently, if you are hosting your website on GitHub pages, you DO NOT need to purchase any SSL add-ons when purchasing your web domains! I think this was a mistake that could have been avoided if only I had researched more… This article is to share how you can use GitHub Pages as your website with your custom website domain and HTTPS setup.
Before we start, check out my previous article “Why I Use Hugo as an Alternative to WordPress for My Blogging Website” if you have yet to :)
PS: The great news is that there is a refund policy so you can still get a refund if you manage to meet the criteria! Good Luck!
What Happened?

Recently, I was using Hugo to create my website and host it using GitHub Pages. I bought a website domain from namecheap and it comes with an optional SSL add-on. If you are not aware, SSL is usually required if you want your website to be https instead of http.
That being said, there is also Let’s Encrypt which is an initiative for giving people free digital certificates to enable HTTPS (SSL/TLS) for websites, to create a secure and privacy-respecting web.
If you have a web server, you can install your free SSL using Let’s Encrypt for HTTPS. But in my case, I only had a web domain. Hence, I thought that Let’s Encrypt wouldn’t work for me and I had to purchase the SSL add-on.
It was only until I started setting up my custom domain in GitHub Pages that I realized that GitHub Pages can be set up with HTTPS without the need to purchase the SSL add-on as GitHub Pages will handle HTTPS for you…
Setting up GitHub Pages with Custom Domain
These are the rough steps I took to set up my GitHub Pages with the custom domain that I bought from Namecheap.
Step 1: Buy your domain

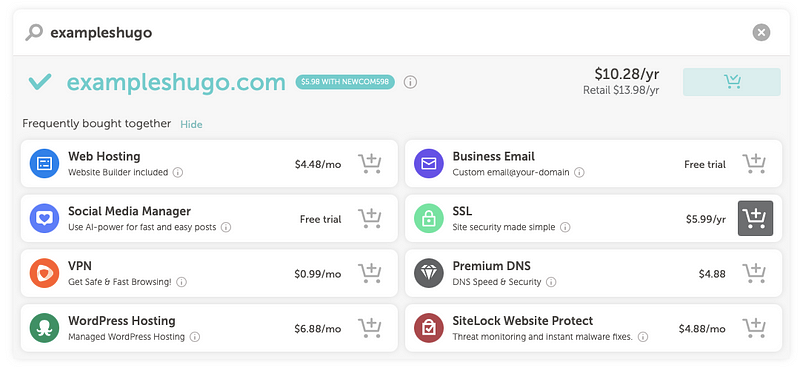
Go to Namecheap and find your domain. Purchase it and DO NOT buy the SSL add-on.
PS: Remember to apply your newcomer promo code when checking out
After purchasing, you should receive an email that requires you to validate your account. Wait for your domain to be Active (can be minutes or hours) before proceeding to step 5.
Step 2: Create your GitHub Pages
]Referencing the guide in GitHub Pages](https://pages.github.com), you will need to create a repository <username>.github.io or <organization>.github.io where username and organization is the name of your account. Below is an example using my setup.

Step 3: Configuring DNS
Step 3a: Configuring DNS (Apex Domain Record)

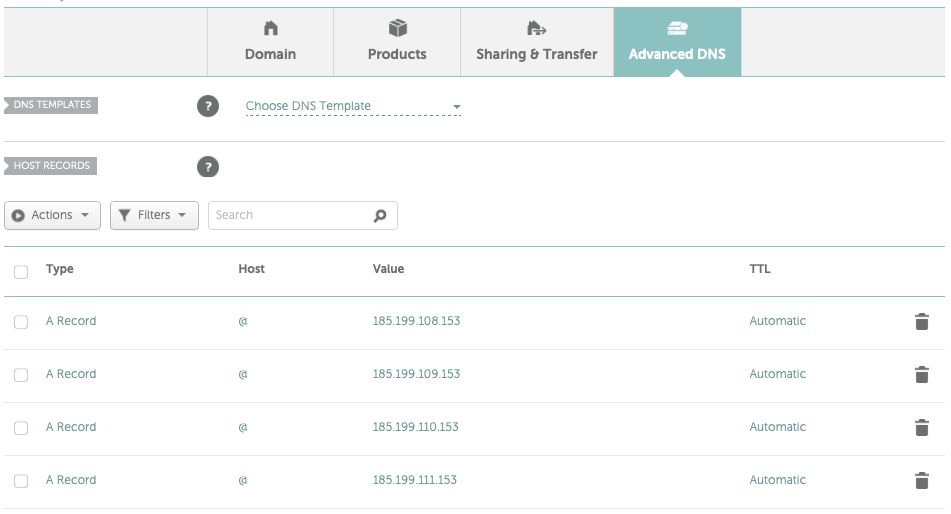
In the Namecheap website, go to Accounts → Dashboard → Domain List → Click on Manage → Advanced DNS and add the A records below. This tells the DNS to route any request to your domain (eg. testinghugo.com) to your GitHub Pages physical IP addresses.
Note: please refer to GitHub documentation for the most updated IP Addresses.
185.199.108.153
185.199.109.153
185.199.110.153
185.199.111.153

Step 3b: Configuring DNS (CName Record)

Additionally, add a CNAME record in your DNS to tell your DNS to map your GitHub Pages (Eg. testinghugo.github.io) to your web domain (Eg. www.testinghugo.com).
Step 3c: Configuring DNS (Txt Record)
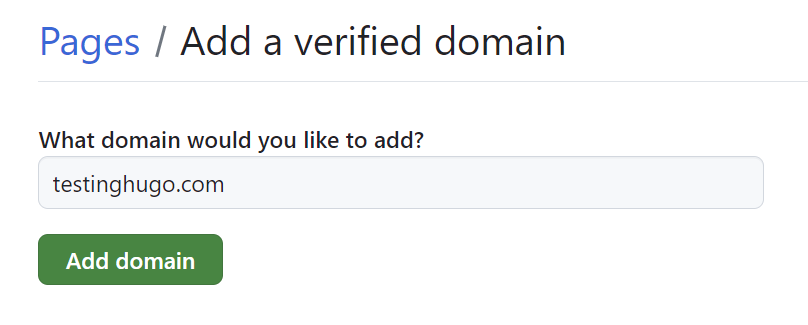
In your GitHub account, go to your Account → Settings → Pages → and click on Add a Domain. You should see the following. Enter your domain name (without the “www”).

After clicking on “Add domain”, head over to Namecheap’s advanced DNS settings and create a TXT record as per the instructions. An example is shown below.

Step 4: Verify if your DNS configuration has been applied
Use the dig command to check if your DNS configuration has been applied. Note that you might want to wait for at least an hour as it takes time for the changes to be applied globally. If you see the output below, it means you are ready for the next step!
C:\User> dig www.testinghugo.com +noall +answer

> www.testinghugo.com.     1756 IN CNAME testinghugo.github.io.
> testinghugo.github.io.   3557 IN A 185.199.110.153
> testinghugo.github.io.   3557 IN A 185.199.111.153
> testinghugo.github.io.   3557 IN A 185.199.109.153
> testinghugo.github.io.   3557 IN A 185.199.108.153
Step 5: Add your Custom Domain to your GitHub Page and Enable HTTPS

Lastly, head over to the GitHub repository that you created in Step 2. Go to Settings → Pages → Custom Domain → and add your domain and click on Save. This will create a CNAME file directly to the root of your source branch.
GitHub Pages will detect the presence of the CNAME file and use the domain specified in the CNAME file as the primary address for your GitHub Pages site. This means that any visitors who access your GitHub Pages site (Eg. testinghugo.github.io) will be redirected to your custom web domain (Eg. www.testinghugo.com).
Lastly, to enable HTTPS, simply check the Enforce HTTPS field and that’s it!
Summary
This post covers how to set up GitHub Pages with a custom domain purchased from Namecheap. GitHub Pages is an affordable way to publish a website and it is very easy to get started with.
The greatest takeaway from this article is that you should not purchase the SSL add-on provided by Namecheap if you are using GitHub Pages as your website hosting platform. Please do not make the same mistake as me!
Anyway, that’s all for this article! I hope the content is useful to you. Check out the link below if you want a TLDR guide (Credits to Phil Lembo):
Thank you for reading till the end! ☕
If you enjoyed this article and would like to support my work, feel free to buy me a coffee on Ko-fi. Your support helps me keep creating, and I truly appreciate it! 🙏