React - How to Implement Custom MultiSelect Cell Editor in AgGrid
If you have a medium.com membership, I would appreciate it if you read this article on medium.com instead to support me~ Thank You! 🚀

Intro
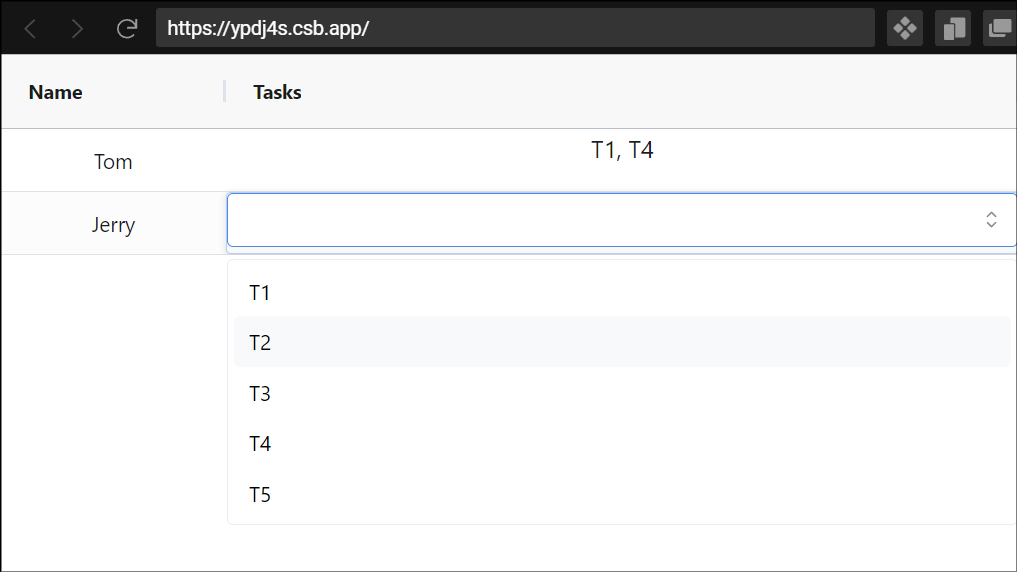
This article is a short write-up (with code references) on how to implement a multiselect dropdown in AgGrid tables with Mantine UI components. At the point of writing, I am using react@18.2.0, ag-grid-community@30.2.0, ag-grid-react@30.2.0, @mantine/core@7.1.7.You can find the source code links down below.
Background Context
AG Grid is a feature-rich data grid designed for the major JavaScript Frameworks. I have played around with this library and it is a very powerful tool with lots of features for displaying data. One of the features I needed was the ability to edit/display the data with customized inputs and components.
- For displaying data with customized components, we can use Cell Renderers or Value Formatters.
- For editing data with customized inputs, we can use Provided Cell Editors or implement our own Customized Cell Editors.
As there are no multiselect cell editors provided by AgGrid, I had to implement my cell editor and that’s the main goal of this writeup.
Implementation
Instead of coding a multiselect component from scratch, I will be using the Mantine MultiSelect component. So let’s start by implementing the customized cell editor (code snippet below).
interface AgGridMultiSelectEditorParams extends ICellEditorParams {
  options: string[];
}

interface AgGridMultiSelectEditorRef extends ICellEditorReactComp {
  getValue: () => string[];
}

export const AgGridMultiSelectEditor = React.forwardRef<
  AgGridMultiSelectEditorRef,
  AgGridMultiSelectEditorParams
>((props, _ref) => {
  const [value, setValue] = useState<string[]>(props.value);
  const refInput = useRef<HTMLInputElement>(null);

  useEffect(() => {
    // focus on input
    refInput.current?.focus();
  }, []);

  /* Component Editor Lifecycle methods */
  useImperativeHandle(_ref, () => {
    return {
      getValue: () => {
        return value;
      }
      isPopup: () => {
        return false;
      },
    };
  });

  return (
    <div className="ag-cell-edit-wrapper">
      <MultiSelect
        ref={refInput}
        className="ag-cell-editor"
        data={props.options.map((option) => ({ label: option, value: option }))}
        value={value}
        onChange={setValue}
        searchable
      />
    </div>
  );
});
Some of the key things that you will probably have to take note of are the following:
- ICellEditorReactComp (getValue & isPopup) - These are the interfaces for the cell editor component
- ICellEditorParams - These are cell & row values made available to the customized cell editor via props.
- CSS Style (ag-cell-edit-wrapper & ag-cell-editor) - I added additional CSS styles to the Mantine component due to an issue I faced (more on this will be covered below).
To use the customized cell editor in AgGrid tables, simply define the customized cell editor in your column definitions.
/* type definition for data */
type Job = {
  name: string;
  tasks: string[];
};

/* hard coded data */
const allTasks = ["T1", "T2", "T3", "T4", "T5"];
const data: Job[] = [
  { name: "Tom", tasks1: ["T1", "T4"] },
  { name: "Jerry", tasks1: [] },
];

/* AgGrid Column Definition */
const columnDefs: ColDef[] = [
  {
    field: "name",
    headerName: "Name",
    maxWidth: 150,
  },
  {
    field: "tasks",
    headerName: "Tasks",
    cellEditor: AgGridMultiSelectEditor,
    editable: true,
    cellEditorParams: {
      options: allTasks,
    } as AgGridMultiSelectEditorParams,
    valueFormatter: (params: ValueFormatterParams) => {
      return params.value.join(", ");
    },
    cellRenderer: (params: ICellRendererParams) => {
      if (params.data.tasks.length <= 0) {
        return (
          <Text size="sm" c="dimmed">
            Click to tag tasks
          </Text>
        );
      }
      return <Text size="md">{params.data.tasks.join(", ")}</Text>;
    },
  },
];

/* AgGrid Component */
<AgGridReact
  rowData={data}
  columnDefs={columnDefs}
  ...
/>
With that, you should have all you need to implement a customized MultiSelect dropdown cell editor in AgGrid. Read on to find out some of the problems I faced and how I managed to resolve them.
Issue #1 - Resolving the CSS Styling

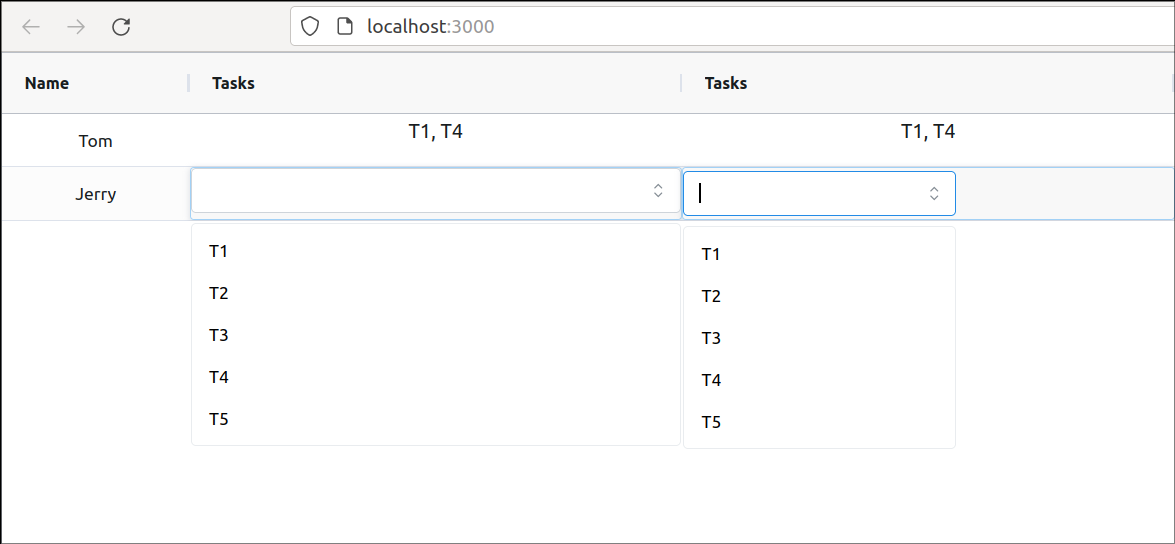
One of my struggles I had was with the css styling where I tried to get my customized cell editor to fill up the entire cell. After some code tracing, I realized the issue occurs when I set the Ag Grid column properties for autoHeight and autoHeaderHeight to be true as shown below.
<AgGridReact
  defaultColDef={{
    ...
    autoHeight: true,
    autoHeaderHeight: true,
  }}
/>
When these properties are set to true, an additional div wraps around the multiselect component as shown below.
<div class="ag-cell ...">
  <div class="ag-cell-wrapper">  <!-- added by autoHeight -->
    <div class="ag-cell-value">   <!-- added by autoHeight + autoHeaderHeight -->
      <MultiSelect />
    </div>
  </div>
</div>
Because of these additional divs, my multiselect input component was unable to fill up the entire cell. After referencing AgGrid’s source code, I managed to resolve the issue by adding the CSS styles ag-cell-edit-wrapper & ag-cell-editor to my AgGridMultiSelectEditor as shown below.
<div className="ag-cell-edit-wrapper">
  <MultiSelect
    ref={refInput}
    className="ag-cell-editor"
    data={props.options.map((option) => ({ label: option, value: option }))}
    value={value}
    onChange={setValue}
    searchable
  />
</div>
Issue #2 - Saving the Data
Well, any edits on AgGrid apply to the client-side data only, which means that if you refresh the page, the data is not saved. To save the data, you can either listen to the changes or save the data with a save button.
Option 1) Listening for Cell Value Events
type Job = {
  name: string;
  tasks: string[];
};

const App = () => {
  const handleCellValueChanged = (event: CellValueChangedEvent<Job>) => {
    console.log(event);
  };

  return (
    <AgGridReact
      onCellValueChanged={handleCellValueChanged}
      ...
    />
  );
};
You can listen for cell value changes with the onCellValueChanged event and update your state with your event handler handleCellValueChanged.
Option 2) Saving Changes with Button Click
type Job = {
  name: string;
  tasks: string[];
};

const App = () => {
  const gridRef = useRef<AgGridReact>(null);

  const onSaveButtonClick = () => {
    if (gridRef.current) {
      const gridApi = gridRef.current.api;

      // To get all the row data
      const allRowData: Job[] = [];
      gridApi.forEachNode((node) => {
        allRowData.push(node.data);
      });

      console.log(allRowData);
    }
  };

  return (
    <div className="App">
      <Button onClick={onSaveButtonClick}>Save</Button>

      <AgGridReact
        ref={gridRef}
        ...
      />
    </div>
  );
};
In this case, you will need to store the reference gridRef of the AgGrid table and on the button’s click event, retrieve all data from using the Grid APIs provided by AgGrid.
Issue #3- Improving User Experience
Lastly, these are some configurations that I like to add to my AgGrid tables as the user experience feels much smoother when it comes to editing. So here are my recommendations:
<AgGridReact
  singleClickEdit={true}
  editType={"fullRow"}
  stopEditingWhenCellsLoseFocus={true}
  ...
/>
- singleClickEdit - a single click brings out the edit mode instead of double-clicking
- editType “fullRow”- this will cause the entire row inputs to light up
- stopEditingWhenCellsLoseFocus - the inputs are saved straight away when the user stops editing
Summary
That’s it! This was just something that frustrated me as it took me a couple of hours to implement this feature in AgGrid. Hence, I wanted to document the implementation & issues I faced. Hopefully, it will be useful to you as well. You can find the code references here on GitHub or CodeSandBox.
Thank you for reading till the end! ☕
If you enjoyed this article and would like to support my work, feel free to buy me a coffee on Ko-fi. Your support helps me keep creating, and I truly appreciate it! 🙏