Database Integration Testing for Custom Spring Boot Data Access Starter Library Using Testcontainers
If you have a medium.com membership, I would appreciate it if you read this article on medium.com instead to support me~ Thank You! 🚀

Intro
Previously, I wrote an article about abstracting your data access logic with a data access library. In this article, I will share my exploration of how I abstracted my data access logic with a custom Spring Boot data access starter library and test it using MongoDB Testcontainers.
Note that at the time of writing, I am using Spring Boot v2.7.5, MongoDB v6.0.3, Kotlin v1.7.0, and Gradle v7.5.
Why do we need Database Integration Test?
Integration Tests lets us knows whether 2 system are working well together. In database integration testing, we test whether the current code logic works well with the current database version. This is especially important whenever we want to upgrade the database version or migrate to another database.
In my case, I faced a major issue when I was upgrading my database as I did not have any database integration test. This was because I mocked the database response as part of my test cases. This was severely insufficient as it wasn’t able to detect whether my services still work with the newer database version. Hence, this exploration serves as a refresher for me on how to implement database integration tests for Spring Boot.
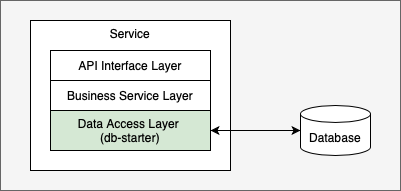
How can we test our Spring Boot services?

Given the above diagram, how can we test the data access layer of our service? There are a couple of ways to do this;
- Connecting to a live remote database - We will need a database server that we can connect to whenever we run our test cases. This can be either a standalone test database server or a test database within an existing database server.
- Mocking database calls - We can use
mockitoto mock our database. However, this approach does not tell us how the codes perform on a database. Eg. a change in the database version might cause our implementation to fail. - Using an in-memory database - We can use an in-memory database like Spring Boot H2 Database to run our test cases. However, an
in-memory database != production database. Our logic might work with the in-memory database but it doesn’t mean that the logic still works with the production database. - Using an embedded database - We can use an embedded database like Flapdoodle Embedded MongoDB to run our test cases.
- Using a containerized database - We can spin up a containerized localhost database server for running our test cases and integrate it with Spring Test using Testcontainers.
Note: Testcontainers is a Java library that supports JUnit tests and allows us to use lightweight, throwaway instances of containers within our tests. With this, we can spin up a MongoDB container instance and run our integration test cases against it.
Obviously, the most accurate way to test our data access logic is using a real database as it is as close as we can get to a “production environment”. Hence, we will focus on choosing a real database for our integration tests.
Choosing the Test Database for MongoDB
Since this article is about MongoDB, let’s compare the solutions between a remote, embedded, and containerized database for MongoDB integration testing.
- Remote vs. Local Database - Firstly, we want to reduce external factors such as network failure. Hence, a local database will be a better option for running our test cases. This means we are down to an embedded or containerized database.
- Embedded vs Containerized Database - I was initially torn between using Flapdoodle Embedded MongoDB for the embedded database and MongoDB Testcontainers for the containerized database. After reading an elaborate comparison review by Piotr Kubowicz, I opted for the latter. TLDR, There are some performance and maintainability issues with Flapdoodle’s embedded MongoDB at the point of writing.
Therefore, we will be testing our Spring Boot MongoDB data access library using Testcontainers which will spin up MongoDB containers for us to run our test cases.
Let’s Start with an Example
project
  |- my-db-starter (Data Access Starter Library)
  |- my-service    (Service that implements the library)
We will create a project with a data access library and demonstrate how to set up the library for database integration testing with Testcontainers. Note that we are using MongoDB as our database of choice.
There are 2 parts to this example:
- Part 1: Implementing the MongoDB Data Access Starter Library
- Part 2: Integrating Testcontainers to the Starter Library.
Part 1 - Implementing the Data Access Library
Let’s start by implementing a data access library by creating a custom Spring Boot Starter Library. I am using MongoDB but you can change this to your database of choice.
Step 1: Initialize the Spring Boot Project

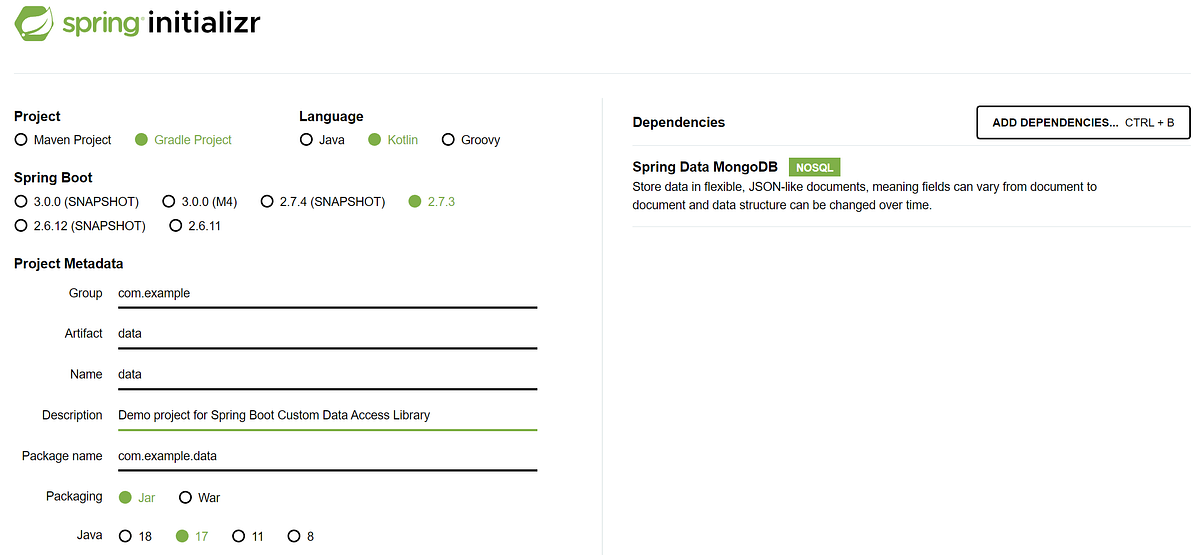
Use Spring Initializr to create a Spring Boot Project. Next, open up the build.gradle.kts file and add the following dependencies and plugins to make the project a Java library as well as adding mongoDB integration as shown below.

For reactive programming, use
spring-boot-starter-data-mongodb-reactiveinstead ofspring-boot-starter-data-mongodb.
Step 2: Create the Autoconfigure Module
As this is a Java starter library, we will need to configure an auto-configure module to let the Spring Boot application know where to find the beans for our data access library. To do that, simply define the configuration below in src/main/kotlin/com/example/data/config/MongoAutoConfiguration.kts.
// Content of MongoAutoConfiguration.kts
@Configuration
@EnableMongoRepositories(basePackages = ["com.example.data"])
@ComponentScan("com.example.data")
class MongoAutoConfiguration
Then, register the configuration above as an auto-configuration candidate by adding it to the EnableAutoConfiguration key in the resources/META-INF/spring.factories file.
// Content of src/main/resources/META-INF/spring.factories
org.springframework.boot.autoconfigure.EnableAutoConfiguration=\
    com.example.data.config.MongoAutoConfiguration,\
    org.springframework.boot.autoconfigure.mongo.MongoAutoConfiguration
With these configurations, any services implementing this library will know where to find the beans.
Step 3.1: Create the Entities & Repository
For demonstration, we will add some sample CRUD logic using both mongoTemplate and mongoRepository methods. Below are the code samples:
// Data Transfer Object (DTO)
data class DemoDto(
    val id: String,
    val name: String
)
// Entity (Actual Data Format stored in Database)
@Document(collection = "demo")
data class DemoEntity(
    @Id val id: String,
    val name: String
)
// Mapper between entity & dto
object DemoMapper {
    fun toDto(entity: DemoEntity): DemoDto {
        return DemoDto(id = entity.id, name = entity.name)
    }

    fun toEntity(dto: DemoDto): DemoEntity {
        return DemoEntity(id = dto.id, name = dto.name)
    }
}
// MongoRepository is an interface for interacting with database
@Repository
interface DemoRepository: MongoRepository<DemoEntity, String> {

}
Note: I am using the DTO pattern to decouple the data access layer from the business layer. For more information, refer to this article.
Step 3.2: Implementing the Data Access Object (DAO)
In our code sample for DemoDao, there are 3 main functions where we can find the demo item by Id, save a new demo item, and delete the demo item by Id. Underlying, we are using mongoTemplate & mongoRepository provided by Spring Data MongoDB to communicate with the database.
// Data Access Object (DAO) with both mongoRepository & mongoTemplate examples
@Component
class DemoDao(
    private val demoTemplate: MongoTemplate,
    private val demoRepository: DemoRepository
) {
    fun saveDemo(demoDto: DemoDto, withTemplate: Boolean? = false): DemoDto {
        return if (withTemplate!!) {
            DemoMapper.toDto(demoTemplate.save(DemoMapper.toEntity(demoDto)))
        } else {
            DemoMapper.toDto(demoRepository.save(DemoMapper.toEntity(demoDto)))
        }
    }

    fun deleteDemo(demoId: String, withTemplate: Boolean? = false) {
        if (withTemplate!!) {
            val query = Query(Criteria("_id").`is`(demoId))
            demoTemplate.findAndRemove(query, DemoEntity::class.java)
        } else {
            demoRepository.deleteById(demoId)
        }
    }

    fun getDemoById(demoId: String, withTemplate: Boolean? = false): DemoDto? {
        if (withTemplate!!) {
            val query = Query(Criteria("_id").`is`(demoId))
            val entity = demoTemplate.findOne(query, DemoEntity::class.java)
            if (entity != null) {
                return DemoMapper.toDto(entity)
            }
            return null
        } else {
            val optionalEntity = demoRepository.findById(demoId)
            if (optionalEntity.isPresent) {
                return DemoMapper.toDto(optionalEntity.get())
            }
            return null
        }
    }
}
Note that the data access object (
DemoDao) is the interface for all data access logic. Any service that implements the MongoDB data access starter library usesDemoDaoto communicate with the database.
Step 4: Implementing the Library (For Info Only)
To communicate with the database, the service will have to add the MongoDB Data Access Starter Library as a dependency in the build.gradle.kts as shown below.

Here’s an example of how my Spring Boot application (my-service) communicates with the database through the MongoDB data access starter library (my-db-starter).
// Example of how to use the MongoDB data access starter library
@Service
class DemoService(private val demoDao: DemoDao) {
    fun test() {
        demoDao.getDemoById("1")
    }
}
Part 2 — Testing the MongoDB Data Access Library
Now that we have the MongoDB data access starter library created, we will look into the database integration testing. To run database integration test, we will need to do the following:
- Spin up MongoDB container instance with
Testcontainers - Set up the test application context that connects to the MongoDB container instance with
@SpringBootTest
Note: We are not running a full integration test from the service layer to the data layer. What we are doing here is running integration tests for the data access layer only. This is to separate the service layer from the data access layer and the test cases are to ensure that the data access logic is functional with the current database.
Step 1: Setting up the Test Environment
With reference to the guides from Piotr Kubowicz and Phillip Hauers, we will set up a reusable MongoDB container to which our Spring Application will connect.
// Code credits to Piotr Kubowicz
object MongoContainerSingleton {
    val instance: MongoDBContainer by lazy { startMongoContainer() }
    private fun startMongoContainer(): MongoDBContainer =
        MongoDBContainer("mongo:6.0.3")
            .withReuse(true)
            .apply { start() }
}

class MongoInitializer : ApplicationContextInitializer<ConfigurableApplicationContext> {
    override fun initialize(context: ConfigurableApplicationContext) {
        val addedProperties = listOf(
            "spring.data.mongodb.uri=${MongoContainerSingleton.instance.replicaSetUrl}"
        )
        TestPropertyValues.of(addedProperties).applyTo(context.environment)
    }
}
The code above sets up the application context containing all the objects we need for the testing. This includes a reusable fresh MongoDB instance for all our test cases. To apply the context to our test cases, we will first create the following annotation & configuration in the src/test folder of the starter library.
@Target(AnnotationTarget.CLASS)
@SpringBootTest(classes = [TestConfig::class])
@ContextConfiguration(initializers = [MongoInitializer::class])
@AutoConfigureDataMongo
annotation class MongoSpringBootTest
@Configuration
@ComponentScan("com.example.data")
class TestConfig
The MongoSpringBootTest applies configuration related to MongoDB tests and TestConfig specifies where the packages are. With that, let’s see how we apply this configuration to the test.
Step 2: Writing Sample Test Cases
Using MongoSPringBootTest, we hook up the test cases with MongoDB test configurations.
@ActiveProfiles("test")
@MongoSpringBootTest
class DemoDaoTest {
    @Autowired private lateinit var demoDao: DemoDao
    @Autowired private lateinit var demoRepository: DemoRepository

    @AfterEach
    fun emptyCollections() {
        demoRepository.deleteAll()
    }

    @Test
    fun your_sample_test_case() {
        // your test case
    }
}
Step 3: Testing the MongoDB Data Access Library
With the setup above, we have configured a MongoDB Access library and set up the library with database integration tests. To test the MongoDB Access library, execute the following gradle task: gradle my-db-starter:test. You should expect the following results in your console.

Summary
With that, we have set up a custom Spring Boot Data Access Starter Library and added database integration testing with Testcontainers. This was all implemented with MongoDB as the database of choice.
From this exploration, database integration testing with Testcontainers was easy to set up and definitely useful for regression testing. Although this article was written in the context of implementing a data access library, you can also implement it inside your Spring Boot application as well.
If you are lost about the entire implementation, please refer to the GitHub repository below. You will find both reactive and non-reactive examples :)
Thank you for reading till the end! ☕
If you enjoyed this article and would like to support my work, feel free to buy me a coffee on Ko-fi. Your support helps me keep creating, and I truly appreciate it! 🙏