Implement a Scalable WebSocket Server With Spring Boot, Redis Pub/Sub, and Redis Streams
If you have a medium.com membership, I would appreciate it if you read this article on medium.com instead to support me~ Thank You! 🚀

Intro
This is a follow-up to my previous article on the design considerations for scaling the WebSocket server horizontally.
In this article, I will go into detail on how we can implement that using Redis Pub/Sub and Redis Streams.
My WebSocket Server Series
- 01: Building WebSocket server in a microservice architecture
- 02: Design considerations for scaling WebSocket server horizontally with publish-subscribe pattern
- 03: Implement a scalable WebSocket server with Spring Boot, Redis Pub/Sub, and Redis Streams
- 04: TBA
Quick Recap

In the last article, we identified two issues that will occur when horizontally scaling the WebSocket server and backend microservices:
- Issue #1: Message Loss due to Load Balancer
- Issue #2: Duplicated Message Processing due to Multiple Subscribers
The solutions were to apply publish-subscribe messaging patterns with consumer groups’ concepts to the architecture design. For more information, refer to the previous article.
Let’s Get Started
Follow along to build a scalable WebSocket server using Spring Boot, Stomp, Redis Pub/Sub, and Redis Streams.
Step 1: Building a WebSocket server
Follow Steps 1 and 2 of my previous article to initialize a WebSocket server using Spring Boot and STOMP messaging protocol.
Step 2: Start the Redis server
For a quick setup, run the Redis server locally using docker.
docker run --name redis -p 6379:6379 -d redis
Step 3: Configure the connection to Redis Server
Add the following configuration to the application.yml file of the WebSocket server to connect to the Redis server.
# application.yml
spring.redis:
    host: localhost
    port: 6379
Step 4: Implement Pub/Sub (Broadcast Channel) for Unidirectional Real-Time Communication

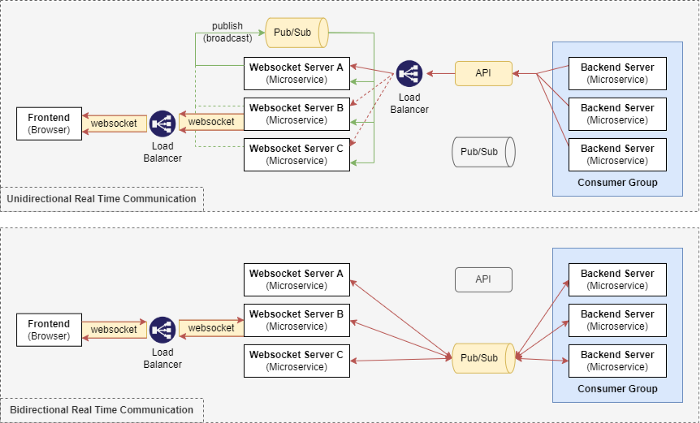
In step 4, we will create APIs for unidirectional real-time communication between backend microservices and web applications (frontend). The WebSocket server receives messages from backend microservices via APIs and broadcasts the messages to all WebSocket server instances using Redis Pub/Sub. The messages are then forwarded to the web applications via the established WebSocket connections.
Step 4.1: Create BroadcastEvent class
BroadcastEvent is a custom object for broadcasting the message from one instance of the WebSocket server to all instances of the WebSocket server.
data class BroadcastEvent(
    @JsonProperty("topic") val topic: String,
    @JsonProperty("message") val message: String
): Serializable
Step 4.2: Configure Redis Pub/Sub - ReactiveRedisTemplate
ReactiveRedisTemplate is a helper class that simplifies Redis data access code. In our configuration, we are publishing/subscribing the value BroadcastEvent and using Jackson2JsonRedisSerializer to perform automatic serialization/deserialization of the value.
@Configuration
class RedisConfig {
    @Bean
    fun reactiveRedisTemplate(factory: LettuceConnectionFactory): ReactiveRedisTemplate<String, BroadcastEvent> {
        val serializer = Jackson2JsonRedisSerializer(BroadcastEvent::class.java)
        val builder = RedisSerializationContext.newSerializationContext<String, BroadcastEvent>(StringRedisSerializer())
        val context = builder.value(serializer).build()
        return ReactiveRedisTemplate(factory, context)
    }
}
Step 4.3: Configure Redis Pub/Sub — Broadcast Service
RedisBroadcastService contains logic for publishing and subscribing to a custom channel (BROADCAST-CHANNEL). This is the channel for broadcasting messages from one instance of the WebSocket server to all instances of the WebSocket server.
Whenever the WebSocket servers receive a message from the BROADCAST-CHANNEL, the message is forwarded to the web applications (frontend) that have established a WebSocket connection with it.
@Service
class RedisBroadcastService(
    private val reactiveRedisTemplate: ReactiveRedisTemplate<String, BroadcastEvent>,
    private val websocketTemplate: SimpMessagingTemplate
) {
    fun publish(event: BroadcastEvent) {
        reactiveRedisTemplate.convertAndSend("BROADCAST-CHANNEL", event).subscribe()
    }

    @PostConstruct
    fun subscribe() {
        reactiveRedisTemplate.listenTo(ChannelTopic.of("BROADCAST-CHANNEL"))
            .map(ReactiveSubscription.Message<String, BroadcastEvent>::getMessage)
            .subscribe { message ->
                websocketTemplate.convertAndSend(message.topic, message.message)
            }
    }
}
Note: @PostConstruct is a Spring annotation that allows us to attach custom actions to bean creation and the methods are only run once. In our case, we are subscribing to the BROADCAST-CHANNEL on bean creation.
Step 4.4: Creating APIs endpoints
The code below creates a REST controller with a POST request endpoint that takes in a request body NewMessageRequest. The topic is the STOMP destination that the client (frontend) subscribes to and the message is the actual message in String format.
@RestController
@RequestMapping("/api/notification")
class NotificationController(private val redisBroadcastService: RedisBroadcastService) {
    @PostMapping
    fun newMessage(@RequestBody request: NewMessageRequest) {
        val event = BroadcastEvent(request.topic, request.message)
        redisBroadcastService.publish(event)
    }
}
The API requests will be broadcasted to all instances of the WebSocket servers as configured in Step 4.3 above.
Step 4.5: Testing Unidirectional real-Time communication via APIs
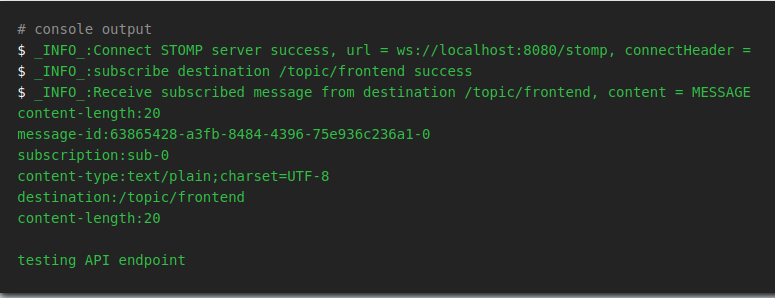
Spin up the WebSocket server, and connect to the WebSocket server ws://localhost:8080/stomp over STOMP protocol using the WebSocket debugger tool developed by jiangxy. Once connected, configure the WebSocket debugger tool to subscribe to the topic /topic/frontend.
Next, send an HTTP POST request to the WebSocket server using the curl command below:
curl -X POST -d '{"topic": "/topic/frontend", "message": "testing API endpoint" }' -H 'Content-Type: application/json' localhost:8080/api/notification
The WebSocket debugger tool should have the output shown below:

This shows that we have successfully configured the WebSocket server with Redis Pub/Sub for scalable unidirectional real-time communication between backend microservices and web applications (frontend).
Step 5: Implement Pub/Sub with Consumer Groups for Bi-direction Real-Time Communication

In step 5, we will use Redis Streams as our Pub/Sub System for bidirectional real-time communication between backend microservices and web applications (frontend). We are not using Redis Pub/Sub as it does not support the consumer groups concept.
Step 5.1: Create StreamDataEvent class
StreamDataEvent is a custom object for data exchange between subscribers and publishers. The message is the actual message in String format and the topic is a required field for the WebSocket server to know which STOMP destination to send the message to.
data class StreamDataEvent (
    @JsonProperty("message") val message: String,
    @JsonProperty("topic") val topic: String? = null,
)
Step 5.2: WebSocket server — Implement Redis stream consumer
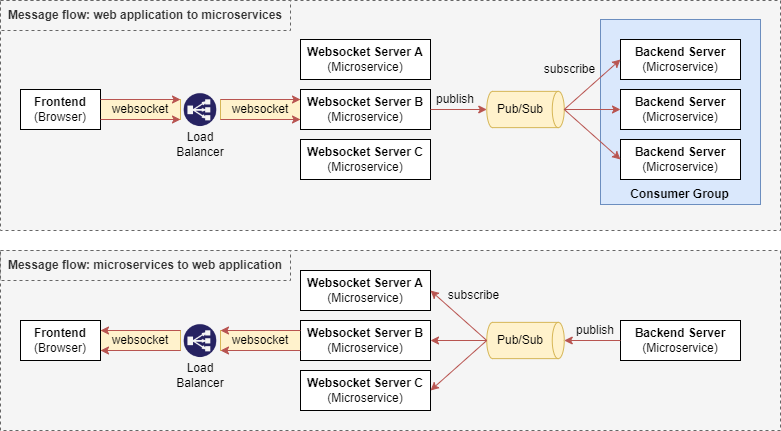
The consumer consumes the message from Redis streams and forwards the message to all web applications (frontend) via the established WebSocket connection.
Note: There isn’t a need to broadcast the message as all WebSocket server instances will receive the message from the Redis Streams.
@Service
class RedisStreamConsumer(
    private val websocketTemplate: SimpMessagingTemplate
): StreamListener<String, ObjectRecord<String, StreamDataEvent>> {
    companion object {
        private val logger = LoggerFactory.getLogger(RedisStreamConsumer::class.java)
    }

    override fun onMessage(record: ObjectRecord<String, StreamDataEvent>) {
        logger.info("[NEW] --> received message: ${record.value} from stream: ${record.stream}")
        record.value.topic?.let { destination ->
            websocketTemplate.convertAndSend(destination, record.value.message)
        }
    }
}
Step 5.3: WebSocket server — Implement Redis stream config
The following code contains configurations for subscribing to Redis streams where the messages will be processed by the RedisStreamConsumer which we configured in Step 5.2.
Here, we are configuring the WebSocket server to listen to the stream identified by the key TEST_EVENT_TO_WEBSOCKET_SERVER. You can create more subscriptions depending on your use cases.
@Configuration
class RedisStreamConfig(private val streamListener: StreamListener<String, ObjectRecord<String, StreamDataEvent>>) {

    private fun initListenerContainer(redisConnectionFactory: RedisConnectionFactory): StreamMessageListenerContainer<String, ObjectRecord<String, StreamDataEvent>> {
        val options = StreamMessageListenerContainer
                .StreamMessageListenerContainerOptions
                .builder()
                .pollTimeout(Duration.ofSeconds(1))
                .targetType(StreamDataEvent::class.java)
                .build()
        return StreamMessageListenerContainer.create(redisConnectionFactory, options)
    }

    @Bean("TestEventSubscription")
    fun subscription(redisConnectionFactory: RedisConnectionFactory): Subscription {
        val listenerContainer = initListenerContainer(redisConnectionFactory)
        val subscription = listenerContainer.receive(StreamOffset.latest("TEST_EVENT_TO_WEBSOCKET_SERVER"), streamListener)
        listenerContainer.start()
        return subscription
    }
}
Step 5.4: WebSocket server — Implement Redis stream producer
The producer provides a method publishEvent for publishing data to the Redis streams. In our example, there is a scheduled job that is publishing periodically (every five seconds, ten seconds after the WebSocket server starts) to Redis streams using the key TEST_EVENT_TO_BACKEND.
@Service
class RedisStreamProducer(
    private val reactiveRedisTemplate: ReactiveRedisTemplate<String, String>,
    @Value("\${spring.application.name}") private val applicationName: String,
) {
    companion object {
        private val atomicInteger = AtomicInteger(0)
        private val logger = LoggerFactory.getLogger(RedisStreamProducer::class.java)
    }

    fun publishEvent(streamTopic: String, data: StreamDataEvent) {
        val record = StreamRecords.newRecord().ofObject(data).withStreamKey(streamTopic)
        reactiveRedisTemplate.opsForStream<String, String>().add(record).subscribe()
    }

    @Scheduled(initialDelay = 10000, fixedRate = 5000)
    fun publishTestMessageToBackend() {
        val data = StreamDataEvent(message = "New Message from $applicationName -- ID = ${atomicInteger.incrementAndGet()}")
        logger.info("Publishing Message: $data to Stream: TEST_EVENT_TO_BACKEND")
        publishEvent("TEST_EVENT_TO_BACKEND", data)
    }
}
Step 5.5: WebSocket Server — Implement WebSocket Configuration
Create a Controller that processes the messages from the web application (frontend) which are sent to the WebSocket server with the prefix /app. In the example below, messages sent to /app/test will be forwarded (published) to the Redis streams at key TEST_EVENT_TO_BACKEND.
Note: There isn’t a need to broadcast the message to all WebSocket instances as publishing to Redis Streams already ensures all backend microservices receive the message. Refer to the diagram in Step 5 for more details.
@Controller
class WebsocketController(private val redisStreamProducer: RedisStreamProducer) {
    @MessageMapping("/test")
    fun greetMessage(@Payload message: String) {
        val event = StreamDataEvent(message)
        redisStreamProducer.publishEvent("TEST_EVENT_TO_BACKEND", event)
    }
}
Step 5.6: Backend microservice— Implement Redis stream consumer
Similarly, in the sample backend microservice, implement the Redis stream consumer.
@Service
class RedisStreamConsumer: StreamListener<String, ObjectRecord<String, StreamDataEvent>> {
    companion object {
        private val logger = LoggerFactory.getLogger(RedisStreamConsumer::class.java)
    }

    override fun onMessage(record: ObjectRecord<String, StreamDataEvent>?) {
        logger.info("[NEW] --> received message: ${record?.value} from stream: ${record?.stream}")
    }
}
Step 5.7: Backend microservice - Implement Redis stream config
The configuration here is similar to the WebSocket server’s configuration. The only difference is that we added the consumer group (CONSUMER_GROUP) which ensures that only one instance of the backend microservice will consume the data from Redis streams.
@Configuration
class RedisStreamConfig(
    private val streamListener: StreamListener<String, ObjectRecord<String, StreamDataEvent>>,
    @Value("\${spring.application.name}") private val applicationName: String
) {
    @Bean
    fun subscription(redisConnectionFactory: RedisConnectionFactory): Subscription {
        val options = StreamMessageListenerContainer
                .StreamMessageListenerContainerOptions
                .builder()
                .pollTimeout(Duration.ofSeconds(1))
                .targetType(StreamDataEvent::class.java)
                .build()
        val listenerContainer = StreamMessageListenerContainer.create(redisConnectionFactory, options)
        val subscription = listenerContainer.receiveAutoAck(
                Consumer.from("CONSUMER_GROUP", applicationName),
                StreamOffset.create("TEST_EVENT_TO_BACKEND", ReadOffset.lastConsumed()),
                streamListener
        )
        listenerContainer.start()
        return subscription
    }
}
In order for the configuration to work, we will have to manually create the consumer group for the stream TEST_EVENT_TO_BACKEND in Redis first using the command below.
Note: It is possible to implement this using codes as well, but I will keep it simple by using the Redis CLI command instead.
docker exec redis redis-cli XGROUP CREATE TEST_EVENT_TO_BACKEND CONSUMER_GROUP $ MKSTREAM
Step 5.8: Backend microservice - Implement Redis stream producer
The producer configuration is similar to the WebSocket server configuration.
Note that the microservice has a scheduled job that periodically publishes to the Redis streams and the message is crafted to be sent to the web application (frontend) at the destination topic /topic/to-frontend as part of our example.
@Service
class RedisStreamProducer(
    private val reactiveRedisTemplate: ReactiveRedisTemplate<String, String>,
    @Value("\${spring.application.name}") private val applicationName: String,
) {
    companion object {
        private val atomicInteger = AtomicInteger(0)
        private val logger = LoggerFactory.getLogger(RedisStreamProducer::class.java)
    }

    fun publishEvent(streamTopic: String, data: StreamDataEvent) {
        val record = StreamRecords.newRecord().ofObject(data).withStreamKey(streamTopic)
        reactiveRedisTemplate.opsForStream<String, String>().add(record).subscribe()
    }

    @Scheduled(initialDelay = 10000, fixedRate = 5000)
    fun publishTestMessageToBackend() {
        val data = StreamDataEvent(
                topic = "/topic/to-frontend",
                message = "New Message from $applicationName -- ID = ${atomicInteger.incrementAndGet()}"
        )
        logger.info("Publishing Message: $data to Stream: TEST_EVENT_TO_WEBSOCKET_SERVER")
        publishEvent("TEST_EVENT_TO_WEBSOCKET_SERVER", data)
    }
}
Step 5.9: Testing bidirectional real-time communication via Pub/Sub
We have configured both the WebSocket server and the sample backend microservice. Let’s test the publishing and subscribing of data from Redis streams using the scheduled data publishing configuration we made in both RedisStreamProducer.
Spin up the two instances of the WebSocket server and two instances of the sample backend microservices. You should notice that the output logs are similar to the ones below.


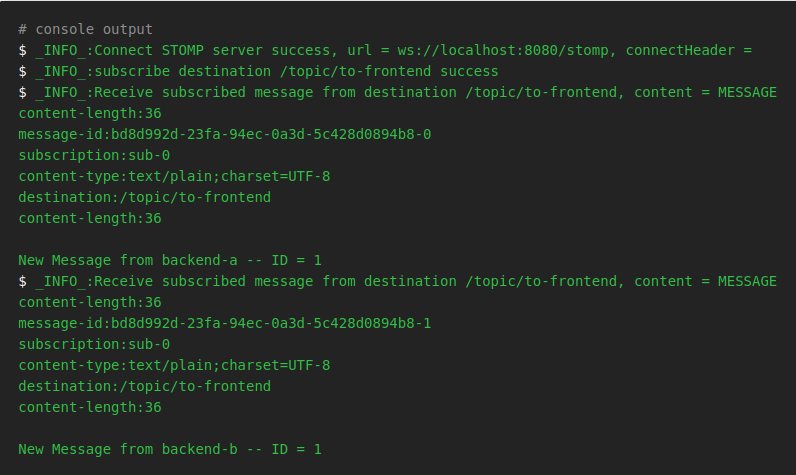
If you are to connect to the WebSocket server using the WebSocket debugger tool and subscribe to the topic /topic/to-frontend, you should see the following logs:

This shows that we have successfully configured the WebSocket server with Redis Streams for scalable bidirectional real-time communication between backend microservices and web applications (frontend).
Summary
That’s it! You can find the sample code here on GitHub. My implementation is not perfect but the purpose is to give you an idea of how you can scale WebSocket servers in a microservice architecture easily with publish-subscribe messaging patterns.
Git Repo Link below if you need the code reference :)
Thank you for reading till the end! ☕
If you enjoyed this article and would like to support my work, feel free to buy me a coffee on Ko-fi. Your support helps me keep creating, and I truly appreciate it! 🙏