Building a WebSocket Server in a Microservice Architecture
If you have a medium.com membership, I would appreciate it if you read this article on medium.com instead to support me~ Thank You! 🚀

Intro
This article is written to share my exploration of real-time communication between frontend and backend using WebSocket. In recent years, microservice is an architectural approach that many developers have adopted, and one of the key principles of microservice architecture is the “Single Responsibility Principle.”
In this exploration, we will look into designing and implementing a WebSocket server that is responsible for establishing a WebSocket connection with the frontend (web application) and also acting as a middleware (or proxy) for real-time communications between the frontend and backend.
Note: This article will not go into detail on how WebSocket or publish-subscribe messaging pattern works. Also, the GitHub link to the project can be found below!
My WebSocket Server Series
- 01: Building WebSocket server in a microservice architecture
- 02: Design considerations for scaling WebSocket server horizontally with publish-subscribe pattern
- 03: Implement a scalable WebSocket server with Spring Boot, Redis Pub/Sub, and Redis Streams
- 04: TBA
Background Context
There are many instances where a web application (frontend) requires real-time communication between the client (browser) and the server (backend). Some examples of such use cases are real-time feeds, real-time collaborative editing, real-time data visualization, real-time chats, notifications, event updates, etc.

Suppose there is a microservice for each use case; the diagram above will then illustrate how WebSocket connections are established between the client (frontend) and each of the individual microservices (backend).
As you can see, this is not an optimal design, as when the number of microservices increases, more WebSocket connections will be created. Hence, let’s look into how a WebSocket server can help to resolve this issue.
WebSocket Server Design
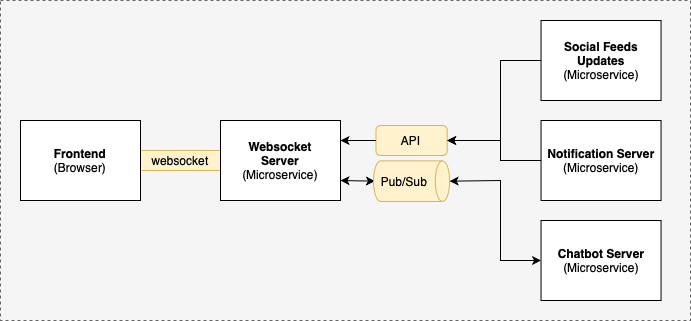
In the design above, the WebSocket server is the only microservice that establishes a WebSocket connection to the web application (frontend). For other microservices, there are two main ways for real-time communications to the web application (frontend):
-
Unidirectional (backend to frontend)
- All microservices (backend) can send messages to the WebSocket server via API where the message will then be forwarded to the web application (frontend) via WebSocket.
-
Bidirectional (between frontend and backend)
- Web application (frontend) can send messages to the WebSocket server via WebSocket, where the message will then be forwarded to the microservices (backend) via Pub/Sub.
- Microservices (backend) can send messages to the WebSocket server via Pub/Sub where the message will then be forwarded to the web application (frontend) via WebSocket.
Building a WebSocket Server
We will build a WebSocket server using Spring Boot, Stomp, and Redis Pub/Sub based on the design above. As I won’t be going into details, you can refer to these amazing articles by Tomasz Dąbrowski and Baeldung.com to learn more about WebSocket implementation with Spring Boot.
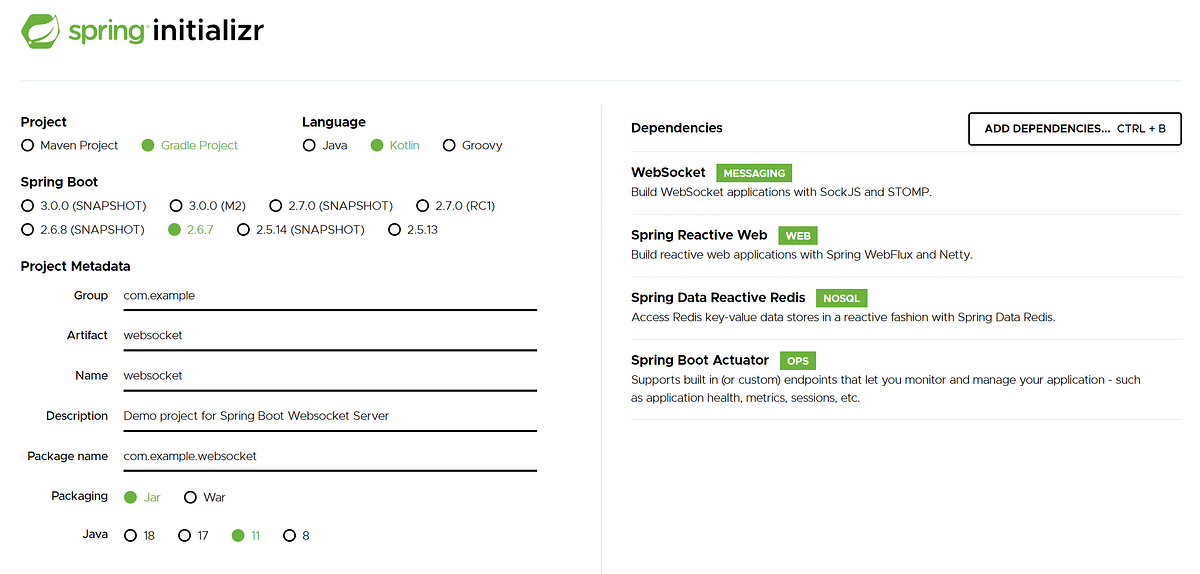
Step 1: Initialize the Spring Boot Project
Head over to https://start.spring.io/ and initialize a Spring Boot project. Minimally, you will require Spring Web, Redis, and Websocket dependencies.
Step 2: Configure WebSocket and STOMP messaging
Create a configuration file, WebsocketConfig.kt, and add the configuration below. The configuration enables WebSocket capabilities for the Spring Boot application.
Note that the stomp endpoint allows all origins for demonstration purposes, but this shouldn’t be the configuration for production setup.
// Configurations for enabling Spring Boot Websocket (WebsocketConfig.kt)
@Configuration
@EnableWebSocketMessageBroker
class WebSocketConfig: WebSocketMessageBrokerConfigurer {
    override fun registerStompEndpoints(registry: StompEndpointRegistry) {
        registry.addEndpoint("/stomp").setAllowedOrigins("*")
    }

    override fun configureMessageBroker(registry: MessageBrokerRegistry) {
        registry.enableSimpleBroker("/topic")
        registry.setApplicationDestinationPrefixes("/app")
    }
}
Step 3: Create API Endpoint for unidirectional real-time communication
The API endpoint provides a way for microservices (backend) to send messages to the web application (frontend). As the messages only require a one-way flow (backend → WebSocket Server → frontend), using APIs will be a good communication medium between microservices (backend → Websocket server).
// API Endpoint for sending a message to WebSocket server
@RestController
@RequestMapping("/api/notification")
class NotificationController(private val template: SimpMessagingTemplate) {
    @PostMapping
    fun newMessage(@RequestBody request: NewMessageRequest) {
        template.convertAndSend(request.topic, request.message)
    }
}
The code above creates a REST controller with a POST request endpoint that takes in a request body “NewMessageRequest” where the topic is the STOMP destination that the client (frontend) subscribes to and message is the actual message in String format. With this, you can now send a message via API to the WebSocket server, which will then be forwarded to the web application (frontend) via WebSocket.
Step 4: Configure Redis Pub/Sub for bidirectional real-time communication (Optional)
Note: Depending on your use case, you can omit this step if you do not require bidirectional real-time communication between the web application (frontend) and microservices (backend).
Communication via APIs between microservices (backend and Websocket server) will not be optimal for real-time communications as compared to using a publish-subscribe messaging pattern. Hence, for bidirectional communication, we will make use of a publish-subscribe messaging pattern.
There are many ways to implement a publish-subscribe messaging pattern but for demonstration and simplicity’s sake, we will use Redis Pub/Sub.
To get started, run a Redis server locally using docker (docker run — name redis-server -p 6379:6379 -d redis) and add the following configuration to the application.yml file for the WebSocket server to connect to the Redis server.
# application.yml
spring.redis:
    host: localhost
    port: 6379
Next, create a configuration file, RedisConfig.kt, and add the configuration below. Essentially, we are configuring a ReactiveRedisTemplate that communicates with the Redis server and is configured to serialize and deserialize messages as String.
// Configuration for ReactiveRedisTemplate
@Configuration
class RedisConfig {
    @Bean
    fun reactiveRedisTemplate(factory: LettuceConnectionFactory): ReactiveRedisTemplate<String, String> {
        val serializer = Jackson2JsonRedisSerializer(String::class.java)
        val builder = RedisSerializationContext.newSerializationContext<String, String>(StringRedisSerializer())
        val context = builder.value(serializer).build()
        return ReactiveRedisTemplate(factory, context)
    }
}
Following this, create a RedisService that contains logic for subscribing and publishing to the Redis server. In the example below, we subscribed to an inbound channel topic GREETING_CHANNEL_INBOUND which listens for incoming messages from other microservices (backend) and forwards all messages received to the STOMP destination /topic/greetings.
@Service
class RedisService(
    private val reactiveRedisTemplate: ReactiveRedisTemplate<String, String>,
    private val websocketTemplate: SimpMessagingTemplate
) {
    fun publish(topic: String, message: String) {
        reactiveRedisTemplate.convertAndSend(topic, message).subscribe()
    }

    fun subscribe(channelTopic: String, destination: String) {
        reactiveRedisTemplate.listenTo(ChannelTopic.of(channelTopic))
            .map(ReactiveSubscription.Message<String, String>::getMessage)
            .subscribe { message ->
                websocketTemplate.convertAndSend(destination, message)
            }
    }

    @PostConstruct
    fun subscribe() {
        subscribe("GREETING_CHANNEL_INBOUND", "/topic/greetings")
    }
}
Lastly, create a Controller that processes messages from the web application (frontend) which are sent to the WebSocket server with the prefix /app. In the example below, messages sent to /app/greet will be forwarded (published) to an outbound channel topic GREETING_CHANNEL_OUTBOUND which will then be processed by any microservice (backend) that is listening to that channel.
@Controller
class WebsocketController(private val redisService: RedisService) {
    @MessageMapping("/greet")
    fun greetMessage(@Payload message: String) {
        redisService.publish("GREETING_CHANNEL_OUTBOUND", message)
    }
}
With that, we have set up the WebSocket server to act as a middleware (or proxy) that communicates with the web application (frontend) via WebSocket and communicates with the microservices (backend) via Redis Pub/Sub.
Testing WebSocket Connection
Using an open-source websocket client debugger tool built by jiangxy as a mock web application (frontend), we can test the WebSocket server we built above.
Test #1: Send message from backend to frontend (via API)
Spin up the WebSocket server, and connect to the WebSocket server ws://localhost:8080/stomp over STOMP protocol using the WebSocket debugger tool. Once connected, configure the WebSocket debugger tool to subscribe to the topic /topic/toast.
Next, send an HTTP POST request to the WebSocket server using the command below:
curl -X POST -d '{"topic": "/topic/toast", "message": "testing API endpoint" }' -H 'Content-Type: application/json' localhost:8080/api/notification
The WebSocket debugger tool should have the output shown below:
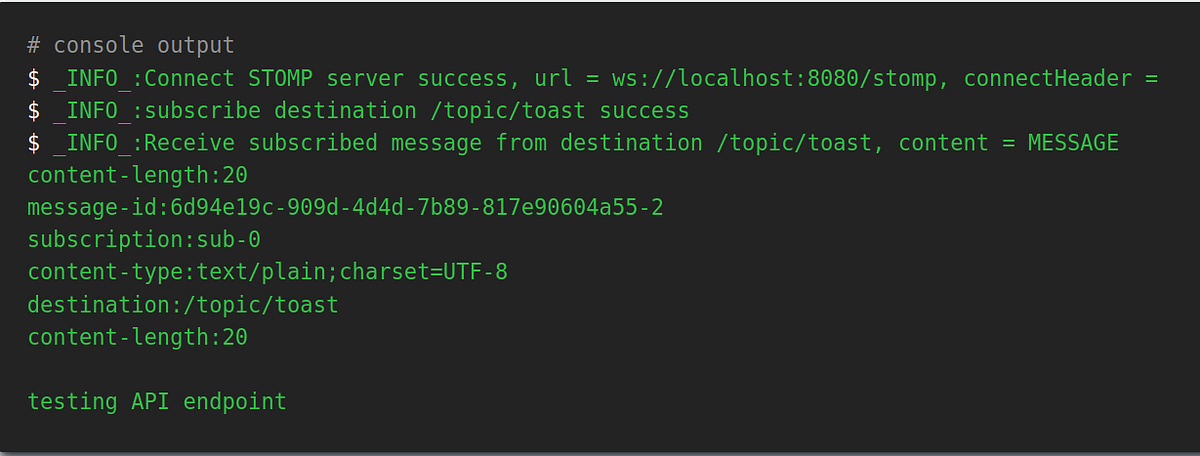
This shows that the WebSocket server has successfully received the message via API and forwarded the message to the web application (frontend) via WebSocket.
Test #2: Send message from backend to frontend (via Pub/Sub)
Spin up the WebSocket server, and connect to the WebSocket server ws://localhost:8080/stomp over STOMP protocol using the WebSocket debugger tool. Once connected, configure the WebSocket debugger tool to subscribe to the topic /topic/greetings (defined above).
Using Redis CLI, publish a message to the channel topic GREETING_CHANNEL_INBOUND (defined above) using the command PUBLISH GREETING_CHANNEL_INBOUND "\"Test Message from Backend PubSub\"".
Note that the extra \" is required as the WebSocket server is configured to receive String messages. The WebSocket debugger tool should receive the message as shown below
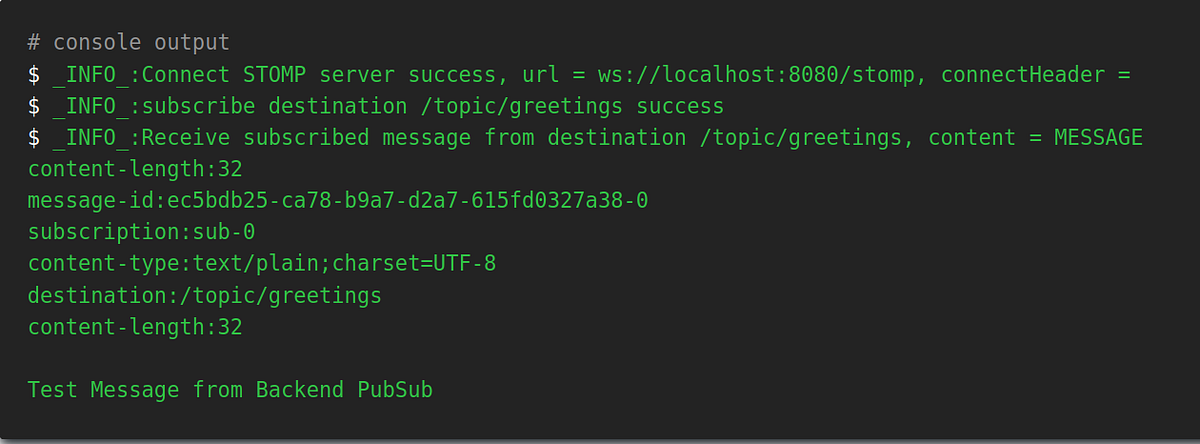
This shows that the WebSocket server has successfully received the message via Redis Pub/Sub and forwarded the message to the web application (frontend) via WebSocket.
Test #3: Send message from frontend to backend (via Pub/Sub)
Spin up the WebSocket server, and connect to the WebSocket server ws://localhost:8080/stomp over STOMP protocol using the WebSocket debugger tool. Once connected, using Redis CLI, subscribe to channel topic GREETING_CHANNEL_OUTBOUND (defined above) using the command SUBSCRIBE GREETING_CHANNEL_OUTBOUND. Send a message to STOMP destination /app/greet using the WebSocket debugger tool, and you should observe the following:
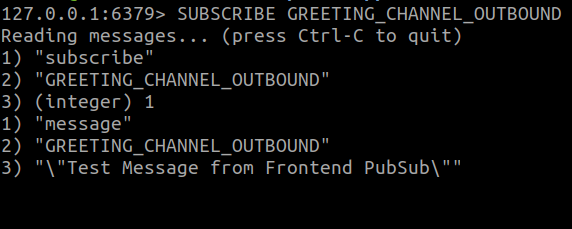
This shows that the WebSocket server has successfully received the message via WebSocket and forwarded the message to the microservices (backend) via Redis Pub/Sub.
Summary
In summary, we have run through a possible design of a WebSocket server in a microservice architecture. Having a WebSocket server greatly aligns with the “Single Responsibility Principle” of microservices, where it manages all WebSocket connections to the web application (frontend) as well as handles real-time communications between the web application (frontend) and other microservices (backend).
That’s it! I hope you learned something new from this article. Stay tuned for the next one, where we will look into scaling the WebSocket server. If you need the source code, refer to the github repository below.
Thank you for reading till the end! ☕
If you enjoyed this article and would like to support my work, feel free to buy me a coffee on Ko-fi. Your support helps me keep creating, and I truly appreciate it! 🙏